Thursday, January 31, 2013


So now I am trial fitting the engine, MTW 90mm drop headers and Prow Flow canisters. I will have to make some adjustments for the exhaust exits. One exits directly into a cross member on the fuselage and I don’t want to cut that. I also mounted the throttle servo with a Sea Craft side mount. I like this set up because the wood mounts tend to wear over time IMO.  It was easy to place the servo in a position that takes advantage of the shortest pushrod as possible and as straight as possible with no bends. This to me eliminates malfunctioning throttle response with nothing to hang up or bend. (Very Important)
Servos:  There are so many options these days but here is my 2 cents.  I like using the manufactures servos that match the radio I am using.  Many giants scale planes have several aftermarket servos per wing, stab and rudder.  I believe in using the largest HV power servo possible. This way you can eliminate some servos which means less to go wrong and less weight. The cost in the end is about the same if not less. The servos I am using are Futaba BLS157 High Voltage Ultra Torque, they have a torque rating of 513.9oz/in at 7.4V  I will be using 2 per rudder, 1 on each stabilizer and 2 per aileron.  If I used a lower torque servo I would have to add 5 more servos to the plane.
Soooo I mounted the elevator servos.  I used the factory linkage hardware. This is where Pilot shines; the turn buckles and ball joints are all 4-40 and nice quality. Note: I should mention that all the hardware in this pilot kit is great.  The parts that I have changed out are for various functioning reasons and partially because I like the cool bling. These planes are built and flown all over the world where access too many aftermarket parts are not available. The hardware included is flying just fine on many planes.
I like building planes. I consider the building side my hobby and the flying side a sport.  I love getting tips from other builders and sharing what I’ve learned.  Here are a couple of tips. Some of you may already know these.  1. I use a sharpie to black out the wood where the servo mounts. Even though it may not match the covering it will match the servo grommets giving a clean look to the exposed wood when the servo is mounted.  2. The eyelets that get inserted into the servo grommets insert up from the bottom. If inserted from the top they can cut into the wood when the screw is tightened and wear the wood over time.  Whenever I see a loose servo that is the first thing I check. 
I am still trying to decide how I want to do the push/pull on the rudder. I keep staring at it and nothing definitive has come to mind yet.  Next will be the wings servos.
Thanks for reading.

Wednesday, January 30, 2013


Ok so today’s progress although big does not appear to be much.  This is a step that needs full attention.  First I packaged the twin DA 170 18hp engine that has been waiting patiently in the box to be set free.  Then after verifying the pre marked holes for a DA 170 on the firewall match I started the task of setting the distance at which the motor needed to be mounted.  To me this is one of Pilot’s best features.  No standoffs are needed you can mount the engine directly to the firewall.

The right angle thrust is pre-determined as long as the firewall is mounted at the same distance from the leading edge of the engine box sides.  So in other words you’re just sliding the firewall evenly back the necessary distance.  Of course I spent two hours doing this in fear of getting it wrong.  Once I had all the measurements marked and re-checked umpting times I secured the firewall with 30minute epoxy and drilled 4 more holes on the sides of the engine box and added the bolts that secured the metal frame on the firewall.  After that was dry I added triangular stock to the front of the firewall for added support.

For your viewing pleasure and plane size reference I added my ugly mug. Tomorrow I will mount up the engine and start mounting servos.  I still am not ready to tackle the rudder yet. I need to come up with a good push/pull system.  The wife’s been asking when she will get to park in the garage again. Not sure how to break the news about the new planes parking spot yet. Woops.
Thanks for reading.

Tuesday, January 29, 2013


So after unpacking and lying everything out I dove in and started with the main landing gear. First I sealed the wood and covering edges under the gear with thinned down epoxy. I then mounted the carbon fiber gear. I replaced the factory wheels with light Whiterose 5” chrome wheels and titanium axels. The axels use a C clip instead of wheel collars making it fare more reliable.

I also changed out the standard wheel pants for Spats. I like the custom look and it shows those cool wheels off.  It will also work better for flying off grass. The tires are low profile so I used Spats designed for a 37% airplane in order to make a close fit and clean look.

I mounted the Whiterose light tail wheel. It’s larger than the factory one and I had to shorten it a ½” in order to put the wheel in the best location for steering. If I put it to far back the tail will over steer.  It raised the tail by ¾” but I wanted extra strength on it and I think it will work out great.

I am at a standstill on the rubber trying to figure out how I am going to customize the servo set up. I don’t want to use cables. I want to use a push/pull rear servo mount system and with the room under the stab it could be difficult. I may just pass on the rudder for a couple days and come back to it.

Thanks for reading, hope you enjoy it.


Monday, January 28, 2013


Wow, I can’t believe it’s here!
The pictures don’t do the size justice. I will get some with me by it for reference.
I was a little nervous when he pulled the boxes out of the truck. They both had some pretty good crunches on them but with sooo much foam around everything it was very well protected. Tonight I will lay everything out and start organizing my steps. The plane doesn’t come with a manual this is all custom assembly. The custom covering job is flawless.

Saturday, January 26, 2013

The plane has arrived! Well at least in America that is. It is in LA clearing customs so should be just a couple days more. I really was expecting it to take much longer.

The bench is cleared and shop cleaned ready for the build starting to get excited.

Thursday, January 24, 2013

Some Specs:
Wingspan:

122 in
Wing Area: 2790 sq in
Fuselage length: 115 in
Weight: 37.9 lbs
Engine: 170CC

Monday, January 21, 2013

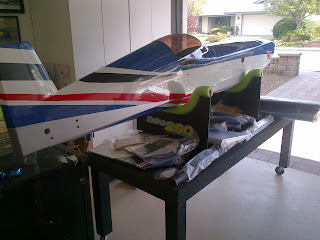
Pictures are of the plane just before it was to be crated up and shipped. It should be on the water as I write this and on it's way to the good old US of A.


Extra 330 Build


Welcome to my build page. Hopefully I can give this enough entertainment so as not to bore you. The first build is an Extra 330 from Pilot RC with 122” wingspan. I ordered the plane direct from the manufacture in China so I could get a custom color scheme. Surprisingly it was easier than I expected.  Delivery date should be early February.  Plans for this plane have been in the works for a while so I have been slowly gathering parts over the last few months. By the time the plane arrives I should have everything to assemble it with the exception of a few small incidentals and unexpected road blocks of course. Everything going into the plane was/is replaced weight in mind. Keeping the plane as lite as possible will help the plane lend itself to easier aerobatic flying. 3D hucking!

Assembly Parts List:

Powered by Desert Aircraft  (DA) 170 with 18hp.  Bolted to a carbon fiber Mejzlik  24x10ETL prop initially. The engine will exhaust through two MTW 90mm drop headers and Pro Flow canisters from Planebender.

Futaba 14mz controlling Futaba BLS157 HV servos. Two per aileron, two per elevator, two per rubber and one on the throttle. The choke servo will use a mini futaba servo.

Batteries are two Fromeco 5200 for the radio and one 2600 on the ignition. Both will power through Fromeco Sahara regulators attached to Fromeco Wolverine and Badger switches. Power surges will be regulated by Fromeco DC UP panel.

Factory wheels will be replaced by Whiterose main and tail wheels. They will spin on Whiterose titanium axels. Factory wheel pants will be replaced with custom made Spats from Chief Aircraft for grass flying.
Fuel is secured by two 32oz 4titude 3 line tanks for a total of 64oz.

Sea Craft Bling aluminum servo arms and servo mounts.

Custom graphics design by B and E Graphics.
Pictures are of the plane just before it was to be crated up and shipped. It should be on the water as I write this and on it's way to the good old US of A.